Roulette Tables and Variants
Unless you've travelled a bit, you might not realise that the roulette table layout you know and love isn't the only one. There are distinct European, American, and French versions whose variances include both the table surface and the wheel itself. Familiarising yourself with the differences will help you feel at home regardless the layout.
European Table Layout
 The essential European roulette table layout is rectangular with chip placement spaces for numbers from 1 to 36, plus a space for zero at the top (above 1, 2, and 3). Specific number bets and combinations thereof called "inside bets" are located therein.
To the left of the number layout (along the first column), and again under the number layout (below 34, 35, and 36), there are additional rectangular areas comprising the so-called "outside bets". They permit betting on larger combinations of numbers simultaneously.
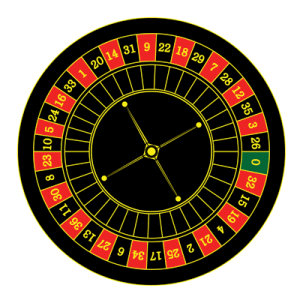
The European roulette wheel consists of the numbers 0 through 36 in this order:
0, 32, 15, 19, 4, 21, 2, 25, 17, 34, 6, 27, 13, 36, 11, 30, 8, 23, 10, 5, 24, 16, 33, 1, 20, 14, 31, 9, 22, 18, 29, 7, 28, 12, 35, 3, 26
The background colours behind the numbers alternate red and black around the wheel.
Some European tables have another area for even more exotic bets against combinations of wheel numbers (e.g. Voisins du Zero, Tier du Cylindre, Orphans). They are sometimes referred to as the "call bets".
American Table Layout
 The American roulette table layout is identical to the essential European layout, except it has an additional space for double zero (00) to the right of the zero space.
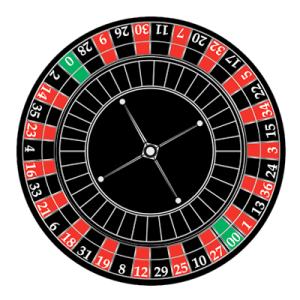
The American roulette wheel consists of the numbers 0 through 36 plus a 00 in this order:
0, 28, 9, 26, 30, 11, 7, 20, 32, 17, 5, 22, 34, 15, 3, 24, 36, 13, 1, 00, 27, 10, 25, 29, 12, 8, 19, 31, 18, 6, 21, 33, 16, 4, 23, 35, 14, 2
French Table Layout
The French roulette table layout and wheel are similar to those in the essential European layout, except instead of having two columns of outside bets to the left of the numbers rectangle, it splits them into single columns on each side.
Why Not Build Your Own?
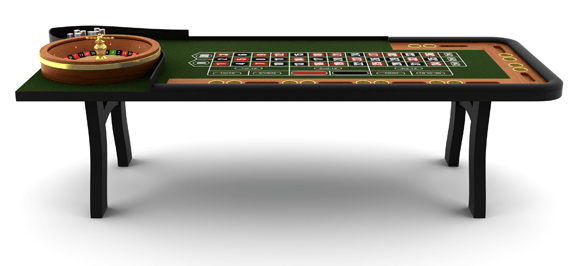
In addition to being a fascinating piece of furniture and entertainment item for a home den or bar area, roulette tables are a great fund-raising tool for charitable organisations hosting events to boost their bottom line. And while there are entire books written on the subject, they're surprisingly easy to construct. Here's how:
The Parts
- Felt roulette layout
- Roulette wheel
- Wooden table that accommodates the layout and wheel
The Tools
- Staple gun and staples
- Flat-head screwdriver
- A level
The Instructions
- Purchase the table, layout, and wheel whose relative dimensions make sense. Both the layout and wheel need to fit on the table surface. The table should be somewhat smaller than the layout because you'll be folding excess layout felt over the edge of the table to attach it without exposing the attachment media. While tables can be found most anywhere, you can buy layouts and wheels online or from billiard or game stores. Layouts are typically 36 inches wide and 72 inches long. Roulette wheels can be costly, so shop around and find the wheel that gives you the highest quality for the lowest price. Think ahead that you'll probably need to level the table depending on where you'll be placing it. Some tables come with feet that can be screwed in and out of the legs so you can level the table without resorting to less visually pleasing external means.
- Place the layout face down on a solid, clean floor. Then place the table upside-down over the exposed backside of the layout. Position the table so that the layout felt can be pulled over each side, preferably all the way over the side and under the table surface to hide the attachment media better.
- Gently pull the excess layout felt over the edge, and to the underside of the table if sufficiently long on all sides. Be sure that doing so doesn't result in the excess felt on the other side no longer being long enough to reach to its side or underside. If it does, back off and settle for a side attachment.
- Use the staple gun to shoot staples through the excess layout felt into the side (or underside) of the table. Staples should be spaced two or three inches apart. After the first four or five staples, lift the edge of the table you're working on to verify the tension between staples isn't leading to stretch marks or other distortions in the active playing surface of the layout. If there are, remove a few staples with the screwdriver and staple again, applying less tension to the excess felt as you go. Inspect again until you get it right, keeping in mind the level of tension you applied so you can do the same for subsequent staples.
- Finish a side and inspect again, correcting for undo felt tension as needed.
- Repeat the stapling steps 3-5 for the other sides of the table.
- Flip the table right side up. If you're satisfied with your work, consider where you'll be placing the table. You may wish to purchase finished wood strips to cover the excess felt on the sides of the table, especially if you stapled the layout into the sides. Obviously, that won't be necessary for sides you plan to have against a wall.
- Place the wheel in the open space on the layout felt at a satisfying distance between the table edge and the active betting portion of the layout.
- The wheel doesn't have to be attached. Indeed, it's often better not to attach it, giving you more options with shims and such when it comes to balancing the wheel. Once you attach it, all balancing must be accomplished through the table.
- Place the table where it belongs and use the level and whatever means at your disposal to level the table.
- Place the ball in the centre of various wheel slots and note whether it seems to be rolling excessively from centre to either side in the slots. If it does, the wheel itself isn't level. Correct by re-levelling the table as needed, or levelling the wheel on top of the table if not attached to the table. Use the ball in wheel slots as your guide.
- Enjoy your new roulette table!